


Home › Stonework Tips & Techniques › Repointing a Stone Wall with Lime Mortar: Step-by-Step Guide
Repointing a Stone Wall with Lime Mortar: Step-by-Step Guide
Good repointing is as much about what you leave in place as what you replace. Sound historic mortar should often remain, while failed joints need to be cleaned, refilled deeply and finished with a mortar compatible with the stone and original masonry.
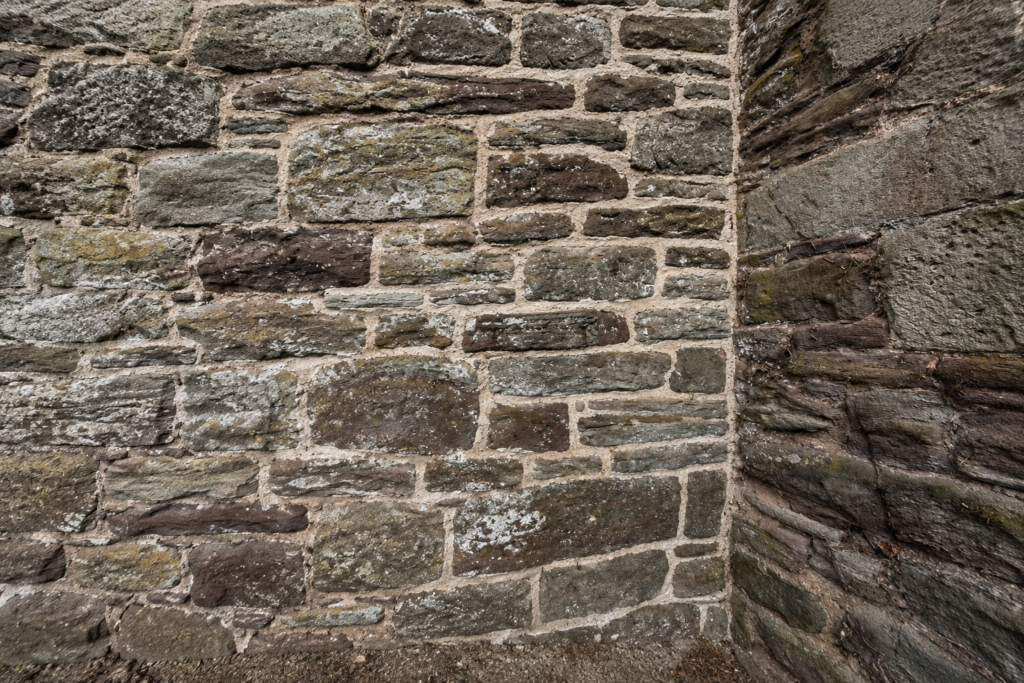
Correctly repointing an old stone wall with lime mortar does not begin with mixing a new batch of mortar. It begins by understanding what is already in the wall. Sound original mortar should not automatically be removed simply because it is old. Repointing should focus primarily on loose, deeply eroded or otherwise defective joints, and the replacement mortar needs to be compatible with the stone, the original masonry, joint dimensions and exposure of the wall.
| Suitable for | Primarily older and traditional stone masonry originally built or pointed with lime mortar |
| What not to remove | Sound original mortar that is still performing its function |
| Typical joint depth | As a rough guide, at least around twice the joint width; irregular rubble masonry may require more |
| Mortar consistency | For repointing, generally stiff rather than wet or runny |
| Application | Work from the back of the joint towards the face and compact thoroughly; fill deeper joints progressively |
| Joint profile | Should reflect the original character of the masonry; rubble stone is often finished approximately flush rather than automatically deeply recessed |
| After application | Protect against rapid drying, strong wind, direct sun, heavy rain and frost |
Not Every Stone Wall Should Be Repointed with Lime Mortar
Lime mortar is not a universal answer for every type of stone construction.
The approach described here is most relevant to traditional and older stone masonry where lime mortar is compatible with the original construction.
A modern masonry system may correctly use a different mortar. A dry stone wall, on the other hand, is constructed without mortar between the stones at all.
The first question should therefore not be “Which lime mortar should I buy?” but rather “What mortar and masonry system am I actually repairing?”
Lime Mortar Does Not Work Simply Because a Wall “Breathes”
Traditional masonry is often described by saying that lime mortar allows a wall to “breathe”.
For practical understanding, it is more useful to talk about porosity, permeability and the movement of moisture through the construction.
Water can enter older masonry through rain, leaking details, rising moisture, failed copings or other defects. When conditions allow, that moisture also needs a route out of the wall.
In many traditional masonry systems, the mortar joints form an important part of that moisture behaviour.
If a very hard and relatively impermeable mortar is inserted between softer and more porous stones, evaporation may be displaced into the stones themselves. This can increase weathering from moisture, frost or salt crystallisation.
The correct mortar is therefore not automatically the strongest mortar. Compatibility with the complete wall is more important.
First Decide Whether Repointing Is Actually Necessary
An older lime joint may appear slightly soft at the surface or may have lost several millimetres of material while still remaining functional deeper within the wall.
Removing all of that mortar across the entire wall can be unnecessary. On historic masonry it also removes original material that may still be performing adequately.
Repointing is more likely to be appropriate where the existing mortar is:
- loose and falling out under light mechanical contact,
- deeply eroded,
- detached from the sides of the stones,
- washed out deeply enough to allow water easy access into the wall core,
- or an unsuitable hard repair mortar that may be damaging the surrounding masonry.
If the wall is visibly cracked, bulging, moving or persistently saturated, the underlying structural or moisture problem should be investigated first. New pointing cannot repair a structural failure.
How to Identify Original Lime Mortar
On old masonry, surviving areas of original mortar are often the most useful reference when planning a repair.
Look for protected locations that may have escaped repeated repairs, such as beneath projections, sheltered areas or less exposed parts of the wall.
Examine:
- the colour of the binder,
- the colour and size of aggregate particles,
- the original joint width,
- the joint profile relative to the stone face,
- the surface texture,
- and any distinctive inclusions within the mortar.
For more significant historic structures, laboratory analysis of surviving mortar can provide useful information about the binder and aggregate before a repair mix is specified.
Non-Hydraulic Lime or NHL? They Are Not the Same
It is too simplistic to say that non-hydraulic lime is for interiors while natural hydraulic lime is automatically the correct choice outdoors.
| Binder | How It Sets | Important Considerations |
|---|---|---|
| Non-hydraulic / air lime | Hardens primarily through carbonation by reacting with carbon dioxide in the air | High permeability and slower hardening; often appropriate for softer and more porous traditional masonry |
| NHL – Natural Hydraulic Lime | Develops part of its strength through hydraulic reaction with water and continues through carbonation | Faster initial setting, greater strength and generally lower permeability than non-hydraulic lime |
Natural hydraulic lime is commonly classified as NHL 2, NHL 3.5 and NHL 5.
A higher number does not mean that the product is automatically “better”.
A stronger hydraulic mortar may be appropriate in more exposed conditions or with denser, stronger stone. Softer, weathered or highly porous masonry may require a weaker and more compatible solution.
NHL 5 is therefore not automatically the right choice for every exterior wall, and NHL 2 is not automatically too weak.
Lime Putty Is Not the Same as Hydraulic Lime
These terms are sometimes confused.
Lime putty is slaked non-hydraulic lime stored with water as a thick paste. In traditional lime mortar it is mixed with suitable aggregate.
Hydraulic lime is a binder capable of developing part of its strength through chemical reaction with water.
They are therefore not simply different consistencies of the same material.
How Much Lime and Sand? There Is No Universal 1:3 Mix
A simple recommendation such as one part lime to three parts sand does not provide enough information for every stone wall.
A volume ratio alone does not tell you:
- how dense the lime putty is,
- how much water it already contains,
- the grading of the aggregate,
- the distribution of different particle sizes,
- the width of the joints,
- which original mortar is being replaced,
- or how exposed the wall is to weather.
A 1:3 ratio may be appropriate in a particular mortar specification, but it should not be treated as a universal recipe for repointing every stone wall.
On historic masonry, the replacement mortar should where possible respond to the characteristics of the original material. With a proprietary bagged mortar, follow the manufacturer’s specified mix and water content.
What Should Traditional Lime Putty Look Like?
For traditional lime-based repairs, well-matured lime putty has historically been valued as a suitable binder.
Guidance from the Czech National Heritage Institute describes well-matured lime putty and refers to a traditional ageing period of at least two years as a reference approach for historic repair work.
The putty should not resemble thin limewash. It should be dense, with a consistency closer to softened butter or soft curd cheese, and should not simply spread into a puddle when placed on a surface.
The same guidance gives an indicative minimum bulk density of approximately 1,400 kg/m³ for traditional lime putty.
This matters because a very wet putty measured as “one part” by volume may contain significantly less actual binder and significantly more water than expected.
Sand Is More than a Filler
Aggregate makes up a large proportion of the mortar and strongly influences both performance and appearance.
Traditional lime mortar benefits from well-graded aggregate containing a range of particle sizes. The largest practical particles also need to suit the width of the joint.
Wide joints in irregular rubble masonry can accommodate a much coarser texture than narrow joints between accurately worked stones.
Local sand can be valuable when matching the colour and character of historic mortar, but it should not be used automatically simply because it is local. Its grading and composition still need to be suitable.
Repointing Mortar Should Be Surprisingly Stiff
Beginners often add water until the mortar becomes very easy to spread.
For traditional lime repointing, the better direction is usually the opposite.
A suitable pointing mortar should be stiff but workable, using as little additional mixing water as reasonably possible.
An excessively wet mix is more prone to shrinkage and shrinkage cracking.
With a proprietary premixed mortar, follow the manufacturer’s technical data sheet and specified water quantity rather than adjusting the consistency freely on site.
How to Repoint a Stone Wall with Lime Mortar Step by Step
1. Identify Only the Joints That Actually Need Repair
Do not begin by taking a grinder to the entire wall.
Assess the masonry section by section and distinguish between:
- sound original mortar – retain it,
- slightly weathered but still cohesive mortar – often retain it,
- deeply eroded and loose mortar – remove it,
- detached mortar – remove it,
- unsuitable hard previous repairs – assess whether they can be removed without damaging the stone.
2. Remove Failed Mortar Carefully, Preferably by Hand
Narrow hand tools such as chisels, hooks and joint-raking tools selected to suit the joint width are commonly used.
An angle grinder should not be treated as the standard tool for cutting out every joint.
On irregular or softer stone it can very easily damage the edges of the masonry, creating permanent scars.
Where an exceptionally hard cementitious repair occupies a wide joint, it may sometimes be possible to cut carefully into the centre of the mortar and then remove the remaining material by hand away from the stone edges.
On valuable historic masonry, this type of work is better carried out by someone familiar with conservation repointing.
3. How Deep Should Old Mortar Be Raked Out?
A fixed instruction such as “rake out 20 mm” does not work for every stone wall.
As a practical guide for older masonry, a depth of at least approximately twice the joint width can be used as an initial reference.
With wide and irregular rubble masonry, degraded mortar may need to be removed considerably deeper.
| Joint Width | Approximate Minimum Depth |
|---|---|
| 10 mm | approx. 20 mm |
| 20 mm | approx. 40 mm |
| 30 mm | approx. 60 mm |
This table is not a design standard. It simply demonstrates why one universal depth cannot be applied to every stone joint.
The aim is to reach sound, cohesive material and create enough depth for the new mortar to be properly packed and compacted.
4. Remove Dust Thoroughly
Raking out old joints leaves fine dust and loose particles throughout the cavity.
The joint should therefore be:
- mechanically cleaned with a suitable brush,
- cleaned all the way into the back of the joint,
- checked for remaining loose pieces of old mortar.
The new lime mortar needs direct contact with a sound substrate rather than a layer of dust.
5. Dampen the Masonry before Repointing
Dry and absorbent stone or old mortar can draw water rapidly from the fresh pointing mortar.
Dampen the joints as necessary using a fine spray before placing the new mortar.
The substrate should be evenly damp, but there should be no standing water inside the joint.
The amount of pre-wetting needs to suit the material. Absorbent sandstone or marlstone may behave very differently from dense granite.
6. Pack Mortar from the Back of the Joint Forward
Good repointing is not a thin decorative layer applied only to the front of the wall.
The mortar needs to reach the back of the prepared joint and be mechanically compacted there.
A practical sequence is:
- place a small amount of mortar deep into the joint,
- pack it firmly using a narrow pointing tool,
- fill corners and irregular spaces between the stones,
- continue progressively toward the face,
- compact each layer as you work.
7. Fill Deep Joints in Several Layers
Deep joints are better filled progressively rather than with one large mass of mortar.
As a practical guide, layers of approximately 25 mm can be inserted and compacted individually.
This helps reduce large voids and gives much better control over how the mortar is packed inside the joint.
8. Use a Tool Narrower than the Joint
A broad decorating spatula is not an ideal universal tool for stone repointing.
Use a pointing trowel, pointing iron or another narrow tool that can physically enter the joint.
If the tool is wider than the opening, it may smooth the mortar at the surface while doing very little to compact it deeper into the joint.
Should Lime Mortar Joints Be Recessed or Flush?
There is no single joint profile that is correct for every stone wall.
On an older structure, the first reference should be the surviving original finish.
With irregular rubble stonework, a joint finished approximately flush with the stone faces and then textured may often be more appropriate than a deeply recessed joint.
Historic stone masonry did not necessarily have a sharply outlined, deeply cut joint around every individual stone.
Excessively deep recessing can:
- over-emphasise individual stones,
- alter the original visual character of the wall,
- expose weathered stone edges,
- create ledges and recesses where water can collect more easily.
The joint profile is both a technical and an aesthetic detail.
When Should Lime Mortar Joints Be Finished?
Do not complete the surface finish immediately after inserting the mortar.
A suitable stage is when the mortar has stiffened and reached approximately a leather-hard consistency.
At this point it holds its shape and can still be worked, but light finger pressure should no longer leave a deep impression.
The joint can then be:
- pressed again to close small shrinkage gaps,
- trimmed to the required profile,
- or brushed with a suitable stiff brush to expose the aggregate texture.
Brushing too early can pull holes into soft mortar. Waiting too long may require aggressive scraping of a hardened surface.
The Greatest Enemy of Fresh Lime Mortar: Rapid Drying
Lime mortar needs suitable conditions while it is developing strength.
Strong summer sun, hot stone and dry wind can be just as problematic as heavy rain or frost.
Freshly repointed masonry may therefore need protection from:
- direct sunlight,
- strong wind,
- heavy rain,
- frost.
Damp hessian or another breathable protective covering can be useful in appropriate conditions.
Where protection against heavy rain is required, another cover may be positioned outside it, but fresh lime mortar should not normally be sealed directly beneath impermeable plastic against the wall surface.
How Long Should Fresh Lime Pointing Be Protected?
A universal rule of “two days” is too short and too absolute.
The required protection period depends on the mortar, weather, wall orientation and absorbency of the masonry.
With traditional lime mortar, expect curing protection to be required for at least several days and often around a week or longer.
Non-hydraulic lime mortar normally needs more careful early protection than a faster-setting hydraulic mix.
Should Fresh Lime Mortar Be Regularly Misted with Water?
Not according to a fixed timetable.
The objective is not to keep the wall permanently wet. The objective is to prevent the mortar from drying too rapidly during its early curing period.
Fine misting and damp protective fabric can be used where weather conditions require them.
Cool, humid weather may require very little additional moisture, while warm dry wind can create a completely different situation.
When Is the Best Time to Repoint Exterior Stonework with Lime Mortar?
Traditional non-hydraulic lime should not be treated as a material that can be used outdoors at any time of year simply because daytime temperatures remain slightly above freezing.
For traditional wet lime processes on historic structures in Czech climatic conditions, guidance from the Czech National Heritage Institute uses a relatively conservative working period of approximately mid-May to the end of September.
For modern proprietary mortars, always follow the manufacturer’s technical data sheet, because individual products may have different temperature and curing requirements.
Cement Is Not Automatically Wrong in Every Stone Construction
It is too broad to say that cement-containing mortar is unsuitable for all stone masonry.
In a new construction, cement or lime-cement mortar may form part of a correctly designed masonry system.
The main problem arises when a hard, dense cement mortar is used without proper consideration as a replacement for softer original lime mortar in old porous masonry.
Similarly, adding “a little cement just to be safe” is not an appropriate way to improve a traditional non-hydraulic lime mortar.
If lime-cement mortar is required, it should be a deliberate specification suited to the construction rather than an improvised addition.
Repointing Marlstone (Opuka) Requires Particular Care
Mortar compatibility becomes particularly important with softer and more porous stone.
Older Czech marlstone (opuka) masonry is a useful example.
It is not correct to assume that all opuka requires one specific mortar, because individual varieties can differ significantly.
However, care is needed when introducing a repair joint that is substantially harder and denser than the surrounding stone and original binder.
Should a Stone Wall Be Water-Repellent after Repointing?
Not as an automatic final step.
The source of water should be investigated first.
- water entering through the top of the wall,
- failed gutters or downpipes,
- poor surrounding ground levels,
- water trapped behind retaining masonry,
- failed joints,
- rising or other forms of building moisture.
A water-repellent treatment may have a place in some specialist stone-conservation situations, but suitability depends on the stone, moisture, salts, previous treatments and the complete deterioration mechanism.
Hydrophobic treatment should not be regarded as a universal “seal the wall after repointing” procedure.
If New Lime Pointing Cracks, Do Not Automatically Fill the Crack Again
A crack provides information about what has happened to the mortar or masonry.
Possible causes include:
- shrinkage caused by excessively wet mortar,
- rapid drying,
- poor compaction,
- poor contact with the existing substrate,
- or genuine movement within the wall.
The cause should be understood before the crack is simply covered with another layer of mortar.
Common Mistakes When Repointing with Lime Mortar
| Mistake | Why It Is a Problem |
|---|---|
| Removing all original mortar | Sound historic material is unnecessarily lost |
| Using a universal 1:3 recipe | Ignores binder form, aggregate, original mortar and exposure |
| Mortar mixed too wet | Increases shrinkage and cracking risk |
| Raking out only a few millimetres | Creates only a thin superficial layer of new mortar |
| Leaving dust in the joint | The new mortar cannot bond effectively to a sound substrate |
| Working onto dry absorbent masonry | Water may be drawn from the fresh mortar too quickly |
| Filling a deep joint in one large application | Increases the risk of voids and poor compaction |
| Using a tool wider than the joint | The surface is smoothed without properly packing mortar deeper inside |
| Deeply recessing every joint | May alter the character of the masonry and expose vulnerable stone edges |
| Working on a very hot wall | The mortar loses moisture too quickly |
| Working immediately before frost | Fresh lime mortar can be seriously damaged |
| Automatically applying water repellent | Does not address the cause of moisture and may be incompatible with the masonry |
Practical Checklist before Starting
- Find out why the existing joints are failing.
- Locate surviving original mortar.
- Identify only the areas that genuinely need repair.
- Select a compatible lime mortar.
- Create a small test panel before beginning on the main visible area.
- After curing, check the colour, texture and joint profile.
- Only then continue over a larger area.
Safety When Working with Lime
Lime is strongly alkaline. Contact with the eyes, mucous membranes or skin can cause severe irritation or chemical burns.
When mixing and applying lime mortar, use appropriate protective equipment, including:
- safety glasses or goggles,
- suitable gloves,
- long sleeves and trousers,
- appropriate respiratory protection when handling dry powdered binders.
Repointing and Building a Stone Wall Are Different Skills
New mortar can restore defective joints, but it cannot correct a poorly built stone structure.
If you are building a wall from the beginning, the first skill is understanding the stone itself: how it sits, how it bonds, how pieces connect through the wall and how the visible face relates to the internal construction.
Want to Learn the Fundamentals of Working with Natural Stone?
Our Dry Stone Walling Course is not a repointing course. Dry stone construction does, however, demonstrate particularly clearly what the stone itself needs to do within a wall: stable placement, bonding, balance, face construction and connection through the depth of the masonry.
These principles are useful when understanding many other stone structures, including masonry that later uses mortar or concrete.
Frequently Asked Questions about Repointing Stone Walls with Lime Mortar
What is the correct lime-to-sand ratio for repointing?
There is no single correct ratio for every stone wall. The specification depends on the binder, density of lime putty, aggregate, original mortar and exposure conditions. A 1:3 ratio can be appropriate in a particular mix but should not be treated as a universal rule.
How deep should old mortar be raked out?
As a rough guide, a depth of at least approximately twice the joint width can be used. Wide irregular rubble joints may need to be cleaned considerably deeper where the original mortar has deteriorated. The important objective is to reach sound material.
Do I need to remove all old lime mortar?
No. Sound and cohesive original mortar should generally be retained where possible. Repointing should focus on loose, deeply weathered, detached or otherwise unsuitable areas.
Is NHL 3.5 always the best lime for an exterior stone wall?
No. The choice between non-hydraulic lime and NHL 2, NHL 3.5 or NHL 5 depends on the stone, condition of the masonry and exposure. Greater mortar strength is not automatically an advantage.
Can I add a little cement to lime mortar?
If the intention is to produce traditional non-hydraulic lime mortar, cement should not simply be added “for safety”. Where a lime-cement mortar is appropriate, it should be a deliberately specified mix suited to the particular construction.
Should lime mortar joints be recessed?
Not always. The profile should respond to the original character of the masonry. Irregular rubble stone may often be more appropriately pointed approximately flush with the face. Deep recession is not a universal requirement.
How wet should lime pointing mortar be?
For repointing, the mortar should generally be stiff and workable rather than runny. With traditional non-hydraulic lime mortar, keep additional mixing water as low as reasonably practical. For proprietary mortars, follow the manufacturer’s instructions precisely.
Should I dampen a stone wall before repointing?
Absorbent masonry should normally be evenly dampened so it does not draw water too quickly from the fresh mortar. The joint should be damp but should not contain standing water.
How long should new lime pointing be protected?
It depends on the mortar and weather. Traditional lime mortars generally need careful protection for at least several days and, in more difficult conditions, around a week or longer. Rapid drying and frost are particularly important risks.
Should a stone wall be sealed after repointing?
Not automatically. Water-repellent treatment is a separate technical intervention whose suitability depends on the stone, moisture conditions, salts and the overall construction. The actual cause of water ingress or dampness should be addressed first.
Technical Sources on Traditional Lime Mortars
The technical principles in this article are compared with conservation guidance for traditional and historic masonry. On significant historic structures, the repair mortar should always be selected according to the actual materials and conditions found on site.
Topics in this article:
Who Is Behind This Article

Expert review
Luděk Komoň Sr.
Stone builder and stonework instructor
He has worked with natural stone since 1998. His experience includes stone walls, paving, cellars, arches and historic reconstruction, and he also passes on his practical stonework knowledge through hands-on courses.
Stonework since 1998
Dozens of projects
Hands-on teaching
More about his experience
→
Related Articles
 Stonework Tips & Techniques
How to Lay Natural Stone Paving: Base, Drainage Fall & Step-by-Step Guide
→
Stonework Tips & Techniques
How to Lay Natural Stone Paving: Base, Drainage Fall & Step-by-Step Guide
→
 Stonework Tips & Techniques
Marlstone (Opuka): Properties, Uses, Stoneworking and Masonry
→
Stonework Tips & Techniques
Marlstone (Opuka): Properties, Uses, Stoneworking and Masonry
→
 Stonework Tips & Techniques
How to Build a Gabion Fence Yourself: Base, Baskets, Stone & Common Mistakes
→
Stonework Tips & Techniques
How to Build a Gabion Fence Yourself: Base, Baskets, Stone & Common Mistakes
→